These projects are a few months old now but better late than never, right??
As we all know, the DIY perusing on Pinterest is a slippery slope. Before you know it, you have a board of projects completely out of your element and 17 projects you want to complete in one weekend. You spend 2 hours in Hobby Lobby, get home, unload your bags of craftiness and feel invincible. I like to call this THE CRAFT HIGH. It is quickly followed by the THE CRAFT LOW as soon as you begin your project and realize you forgot to pick up more glue sticks for the glue gun stopping you dead in your tracks.
Due to my large craft box (also known as evidence of a few too many Hobby Lobby trips), my goal was to create some things out of the things I already had. I must admit I did make 1 teeny tiny trip to HL but it was legit. I stayed focused and left spending less then $5. It barely classifies as a trip at all. So here goes my DIY rundown…
The first project I decided to tackle was some art work that I actually collected all the materials for a while back and never got around to making. I’d been saving toilet paper rolls for this one for a while. I had the canvas left over from a 2-pack I bought for a Mothers Day gift I made last summer and the paint was already on hand from painting my red table, I had the white in my craft box as well. So, a little cutting, painting, drying and hot gluing later, and I had this.
I used in a collage wall in my kitchen. I’m still looking for the right thing to add in that little hole underneath it to even out my square. Any ideas? I’m open to suggestions!
I was really pleased with how it turned out and the “H” I made with the placement of the toilet paper roll cut outs was a complete coincidence. I didn’t even notice it until I hung it in the collage on my kitchen wall. I obviously love my initials, even subconsciously! I like that it brings some of the red in the living room into the kitchen and brightens up the wall. It was definitely one of the easiest and cheapest projects I’ve ever done. I highly recommend it to anyone wanting a thrifty project to interject some color. It also would be good with kids. And creating multiple canvases for a wall of them would be cool too.
My other project didn’t quite go as I first planned. I had wanted to create a mail organizer to hang by the door. I loved the idea of using an old shutter like this example I found on Pinterest.
So, on a complete whim, I searched Craigslist for a shutter and found this one for $10 and *BONUS* it was already painted red!! So, I picked it up from the sweetest lady who even invited me in for dinner. But I declined and left with my shutter. When I got home, I realized this wasn’t actually a working shutter but a decoration shutter that had been glued shut, thus not allowing me to slip mail in between the slats…major bummer. But I did decide to take it home with me for Thanksgiving to see if my Dad could help me add some hooks for hanging my keys by the door. But I had the epiphany on my drive home that I could add some clothes pins to do some mail holding as well! So, a few screw in hooks, some gorilla glue and a couple clothes pins later, I was really excited with how it turned out.
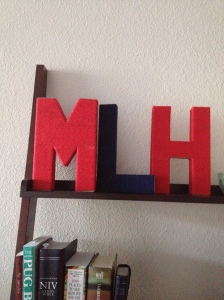
This last project was one I had been wanting to do for a long while. I already had the yarn and decided they make a great addition to my adder shelves. So I swung by the good ole’ HL and picked up some cardboard letters for $1.25 each and wrapped them with yarn adding Elmers glue along the way to keep it in place. Believe it or not, the L was the hardest of the bunch. These look great on my shelves and I recommend these to the craft challenged and also those who are looking for a personalized gift. They would make a great baby shower decoration and gift as well.
My DIY itch has been scratched for now. I’m sure I’ll have more to share in the coming months. Stay tuned…


![80efbf302a2d393d4dd83c649ed5ea6d[1]](https://melhuff.wordpress.com/wp-content/uploads/2013/03/80efbf302a2d393d4dd83c649ed5ea6d1.jpg?w=199&h=300)


1 comment
Comments feed for this article
03/05/2013 at 4:37 pm
Brooke
So cool! Thanks for sharing. I will be living vicariously through your crafts for a while because all my free time for crafting has disappeared 😉 So keep em comin’ crafty lady!